How can I print circular labels on two across (two up) label stock?
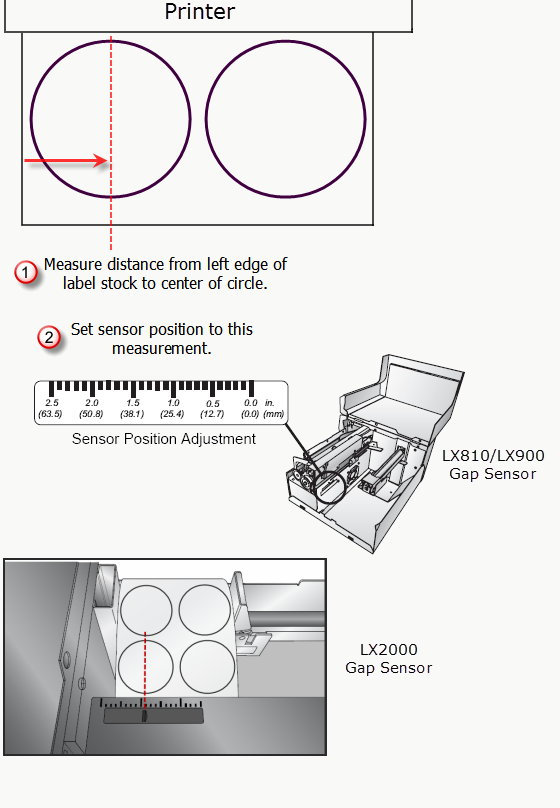
A. Adjust Sensor Position
Before you load the label stock, you must adjust the label sensor position to correspond with the center of the circular label. This sensor tells the printer where to start printing.
B1. Setup the Label. (When printing from Programs other than BarTender)
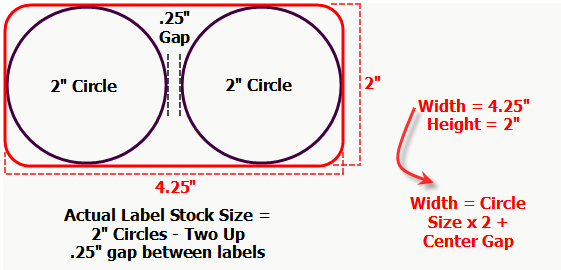
1. First you must setup the label as a rectangular label since most design programs do not have the ability to display the page layout as circles. The example below is for 2" circles two-up. However, the concepts apply to any size circular label up to 5" in diameter.
2. Set your label size equal to the width of the two label across plus the gap between. In the example graphic below the label size would be 4.25" x 2".
3. Place the left label on the page so that left, top and bottom edge of the label touches the edge of the page. Place the right label on the page so that right, top and bottom edge of the label touches the edge of the page. This will automatically leave you with the correct gap between labels.
Note: For this setup the circle graphic must be pre-cropped into a circle. The software or the driver will not do this for you. In Adobe Illustrator this is called a "clipping mask".
Note 2: You can use this procedure for BarTender. However, the BarTender(PC) program has a special wizard to assist you in this process. This wizard is useful if you do not have pre-cropped graphics as it will crop non-circular shapes into circles if necessary. See section C.
B2. Print Two Up Circles in BarTender using the Label Setup Wizard.
1. Open BarTender. Go To File - New.
2. Choose Blank Template.
3. Choose your printer.
4. Set to Specify Custom Settings.
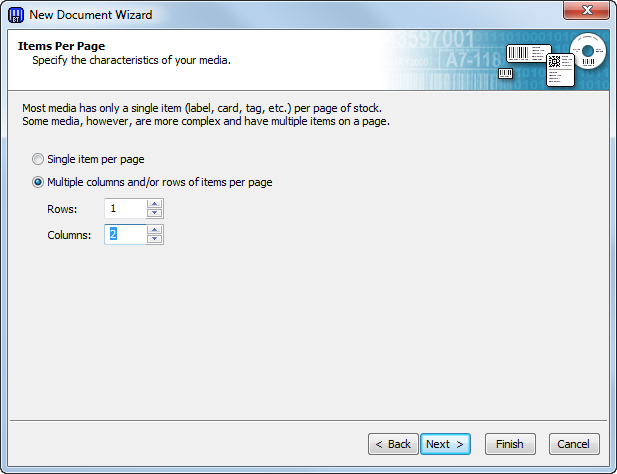
5. Choose Multiple columns and/or rows of items per page. Set Rows to "1" and Columns to "2".
6. Set Sides Edges to "No, it does not".
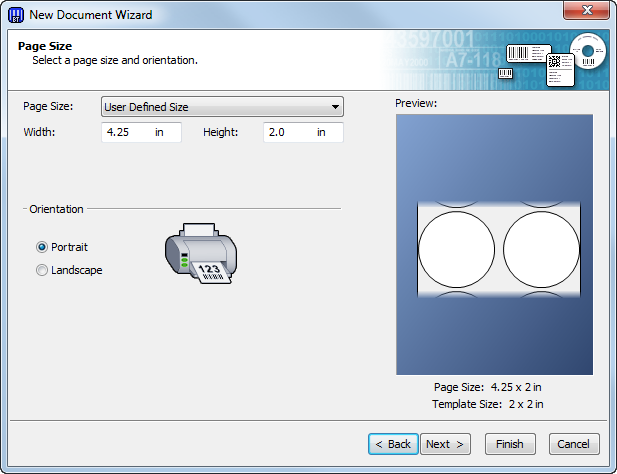
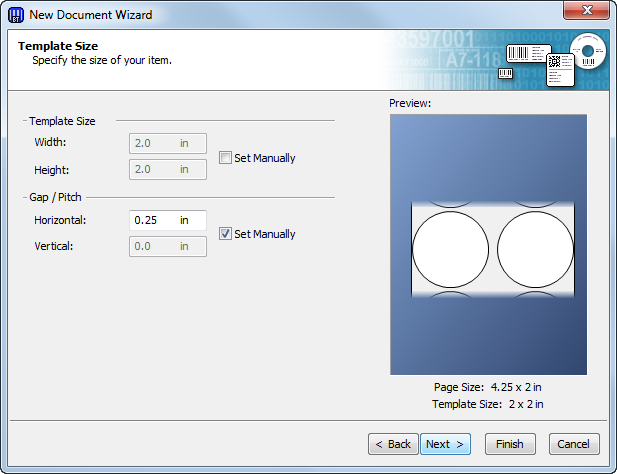
7. Set Page Size as shown above for your specific label. Page size = Circle(Label) Size x 2 + Gap. (4.25" in this example).
8. Set to Circle (or rectangle if you have a two up label of a different shape).
9. Check "Set Manually" next to Gap/Pitch. Set the Gap/Pitch to the gap between your label or .25" in this example.
10. Set Starting order to "Top-Left".
11. Add an image background if applicable. If you have non-circular images you wish to use on your circle template, add them here. Click Finish to view the label which can now be edited.
Related Articles:
How can I print circular or round labels
Related Articles
How can I print circular or round labels using the LX Series Printers?
1. Design. If you are able to adjust your image design, these tips will make printing circular labels much easier. Circular labels work best when the image does not fully cover the label. However, if you must fully cover the label with ink, it is ...Primera's new Smart Part format for Custom Label Stock Explained
You can now see important information about your label stock embedded within the part number printed on a label inside the core. Read below for instructions on how to decipher this smart part number. SMART PART: The format is: PRI (for Primera) – ...How to Create A Custom Label Order
1. Go to https://www.primera.com/customlabel/generate/label/ 2. Select your printer type. 3. Then click Select Materials. View the material guide for more information on each material type of look at the pictures below. Premium Gloss Matte BOPP High ...How do I correctly load the label stock to avoid feeding and printed image alignment offset problems? (LX Series)
Incorrect loading of the label stock is the number one reason for horizontally or vertically offset images and a variety of other feeding problems. Below is a top view of the printer with the cover open. There are several main areas to watch for when ...There is a label stuck or jammed in the feed area of my LX Series label printer. Unable to feed in Label Stock. How can I remove it and prevent it from happening again?
If you are unable to feed in new label stock, you may have dust or debris blocking the stock sensor or part of a label stuck inside. Unexplained missing labels on the roll could actually be stuck inside the machine. If you don't think there is a ...