How can I print circular or round labels using the LX Series Printers?
1. Design. If you are able to adjust your image design, these tips will make printing circular labels much easier. Circular labels work best when the image does not fully cover the label. However, if you must fully cover the label with ink, it is best to remove any unnecessary border lines that would easily draw the eye to misaligned prints. Use a solid background that can be easily overbled. Keep important text and design objects away from the edges. Finally, avoid circular text, which can have the same effect as a border, by drawing the eye to any defects.
2. Overbleed. Follow this guide on over bleeding labels. This process basically increases the printed images' size and centers it on the label so any slight alignment shift will not be noticed. However, it is important to follow the design tips in item one for this process to work.
3. Guides. Ensure that your label stock is installed properly using the input guides on your printer if it has them. Follow this article. For the LX500 you can purchase guides to help with this process.
4. Edge Scan. Every few labels, the printer will scan your media's edge to find the correct left margin starting position. You can increase this scan frequency or turn it off completely if it is not detecting the edge accurately. This can happen on circular labels more easily. Go to Print Hub on PC only to adjust this setting. Find the Print Alignment Tab. Click More Settings.
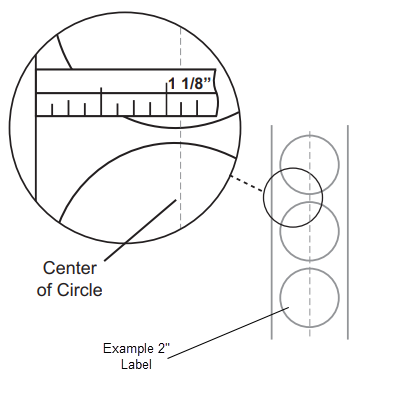
5. Sensor Position. Circular, nonstandard label shapes or multiple labels across will require precise adjustment of the label sensor. If you use circular or other nonrectangular die-cut labels, make sure the sensor is set to the top of the label where the shapes are closest together. If the sensor is too far to the right or the left, the printer will still sense the label, but the image may be offset downward because the printer will start printing at the wrong position. If you are using stock with multiple labels across, make sure the sensor corresponds to a place on the stock with a label and not a vertical gap.
The sensor can be adjusted using the slide bar on the inside or on top of the printer. Below the slide bar is a measurement or tick mark representing the distance between the edge of the label stock and the sensor. Measure the distance from the edge of the label stock to the correct position on the stock. Set the sensor to this measurement.
The sensor can only be moved a maximum of 2.5 inches (depending on the printer) from the printable area's left side. This means that the maximum diameter circular label that can be printed is 5 inches. For circular labels larger than 5 inches in diameter, you must have a black mark printed on the back of the label stock. Now change the Sensor Type in the driver to Reflective. The printer will now look for the black mark representing the next label's beginning instead of the die-cut. For more information on changing the Sensor Type in the driver settings, see this article.
LX910 and LX3000 Video Demonstration
Article ID: 44833
Related Articles
How can I print circular labels on two across (two up) label stock?
A. Adjust Sensor Position Before you load the label stock, you must adjust the label sensor position to correspond with the center of the circular label. This sensor tells the printer where to start printing. B1. Setup the Label. (When printing ...How many labels per cartridge can I print? How can I calculate ink cost per label in Print Hub? (LX Series Printers)
The cost estimator is found under the queue section on the first tab of the Print Hub on PC and on the first tab of the Config Utility on Mac. On PC the last five job costs are stored in the list. Each job will show the cost per label based on the ...How to create labels for my tapered container (LX Series Label Printers)
Tapered containers are a challenge because a standard rectangular label does not look right when applied to the container and can be difficult to apply without bubbles. Full wrap-around labels for tapered containers usually have a curve (arc) on the ...Filter Failed message appears in print queue. Eddie or LX Series Printer is not printing. Ventura, Catalina, Big Sur, Monterey, Sonoma and Sequoia require new drivers (Mac).
Try these steps in order. 1. Install the latest version. Occasionally, the driver will be corrupted after an OS update. Download the latest version from the products download page. You can find the latest software for your product at the location ...How do I print a two page (front-back) label using BarTender Ultralite? (LX Series Label Printer)
The instructions below are for two page labels where both the first and second page are the same size. Each have separate designs. This would typically be used for front-back labels on a container. For different sized front and back labels you ...