How to Create A Custom Label Order
2. Select your printer type.
3. Then click Select Materials. View the material guide for more information on each material type of look at the pictures below.
4. Click Select Dimensions.
5. Choose the Number of Rows Across if applicable. Often it makes sense to create multiple rows if you have very small labels less than 1.25" wide. Please note that when multiple rows are selected the labels cannot be used in most automated applicators and will need to be hand-applied.
6. Select the shape.
- RCR = .125" Rounded Corner which is the standard corner round for label stock.
- SQR = 90 degree square corners .
- OVA = Oval or Circle. Note: If your height and width are equal it will be a circle.
7. Click Select Extras.
- Perforation will add slits in the liner so that it will be easy to hand separate the labels. Do not select this option if you plan to use a reminder or an applicator with your labels. This option will add cost to each roll
- Rush will speed up your order by as much as 2 weeks.
- Black Mark will add a black timing mark on the back so the label printer can more easily detect the gaps between labels. This is necessary for any clear label stock, odd shapes, circles larger than 5" or labels where the waste label matrix is not removed from the liner (kiss-cut). This option will add cost to each roll. The fee is $100 per size/per order so if you are adding this option it makes sense to order a larger quantity since the fee is the same for 1 roll or 100 rolls.
8. Confirm Selection to receive a quote.
9. Confirm all information before ordering. If anything is incorrect at this point, just click the "Back" button. Remember, there are no returns on custom label orders since they were made especially for you.
Printer Model. Confirm your printer model is listed. This will determine the correct core size and other limitations such as the minimum media width the printer will accept and the orientation of the black mark if chosen. A 2" core will be used for LX400 and LX500. All other printer models will use a 3" core.
Spec Sheets.
Once again double-check the material chosen is right for you. Consult the material guide or the individual spec sheets below. If in doubt, contact sales or support and ask for a label sample so you can test water resistance, durability, adhesive strength etc. before your order a large quantity.
- Extreme White Matte BOPP
- Extreme White or Clear High Gloss Poly
- Premium Gloss Paper (As of 1-1-24 a New Premium Gloss Paper material is used for all custom orders and select in-stock rolls as old stock is depleted - See Attachments below)
- Vintage Matte Paper
- Extreme White Matte Polyjet (See below)
Die Price is listed if a new die is necessary for your chosen size. If a die already exists for your size you will not be charged for this. If a new die is necessary, your label order will take longer to complete. What is a Die? A flexible steel die is used with a magnetic Cylinder attached to a die cutting machine to cut your labels. The die must be custom ordered and cut for your specific size using a steel cutting CNC machine.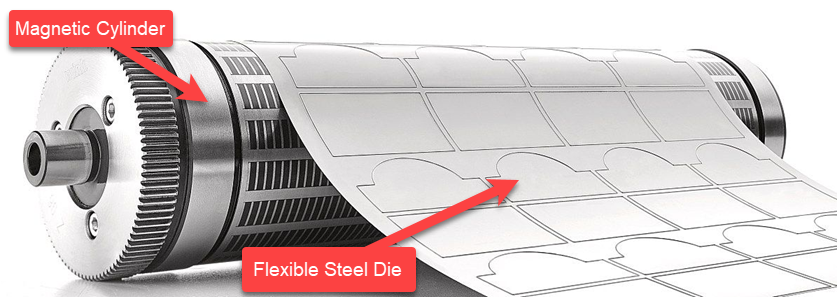
- Quantity per roll is calculated and listed on this screen. Your label height determines this quantity.
- Price per roll at the indicated order quantity is listed. Notice that your price will go down if you order more roll.
10. Enter the amount you would like to order, check the agreement box then click Add to Cart.
Note: When ordering custom labels, to ensure prompt processing please do not add other items to the cart before checking out. If you need other items please make a separate purchase.
Article ID: 101520
Related Articles
Primera's new Smart Part format for Custom Label Stock Explained
You can now see important information about your label stock embedded within the part number printed on a label inside the core. Read below for instructions on how to decipher this smart part number. SMART PART: The format is: PRI (for Primera) – ...There is a label stuck or jammed in the feed area of my LX Series label printer. Unable to feed in Label Stock. How can I remove it and prevent it from happening again?
If you are unable to feed in new label stock, you may have dust or debris blocking the stock sensor or part of a label stuck inside. Unexplained missing labels on the roll could actually be stuck inside the machine. If you don't think there is a ...My Custom Label Order is Incorrect or Defective. What can I do?
Please contact Primera Technical Support to troubleshoot this problem and possibly request a redo of your label stock. You and Primera Support can use this guide to determine the cause and find a solution. First, we must determine if the stock is ...How to create a slack loop to prevent Repeating sections of blurry printing - Inconsistent TOF alignment - Printing over on the same label using pre-die-cut labels. (LX600/LX610)
Issue: Pre Die-cut labels printed on the LX600 or LX610 has inconsistent Top of Form (Vertical) alignment or print over and over on the same label or have repeating sections of blurry printing. The smaller the size down to the minimum of 2", the more ...How do I create a label template in Bartender? (LX Series Printer)
When you open BarTender you will be given the choice to select an existing label or create a new one using a wizard. Use the following instructions as a guide through the wizard setup process. 1. Choose "Start a new BarTender document..." 2. ...