My label printers skips labels between prints, feeds out blank labels or is printing over the same place. (LX500, LX600, LX610, LX910, LX2000, LX3000, LX4000).
The printer will skip one label before printing for the first time after loading a new roll of label stock. This is to prevent jamming of labels and cannot be disabled.
The printer should not skip labels between consecutive print jobs.
If the printer is skipping labels at times other than the instance described above, or slipping while printing over the same spot on the label try the following:
1. Adjust the Present or Cut options. We don't recommend cutting/presenting between every label as it requires the printer to move the label stock forward to cut and back to print. This extra movement can cause skipping, printing over on the same spot, or extra space. It is best to cut or present the label at the end of the job or after you press the feed button.
LX910/LX3000/LX4000:
LX900:

3. Sensor Position. LX Series printers have an adjustable sensor used to detect the gap between die-cut labels or the reflective mark on other labels. If the sensor is not set within the label stock or on the reflective mark, it will prevent proper detection of the label stock and cause excessive feed, offset printing, or label skipping. The sensor needs to be set within the label stock. So for a 1.5'' x 1.5'' square label, you would need to set the sensor to less than 1.5 inches. If you will only be doing rectangular die-cut labels, the sensor can be left at about .5 inches and you will never have to change it.
Circular, nonstandard label shapes or multiple labels across, will require precise adjustment of the label sensor. The sensor must be in the exact center of the label or at the uppermost label to detect the gap properly. Slide bar is a measurement which represents the distance between the edge of the label stock and the sensor. Measure the distance from the edge of the label stock to the correct position on the stock. Set the sensor to this measurement. Images of the sensor are shown in this article.
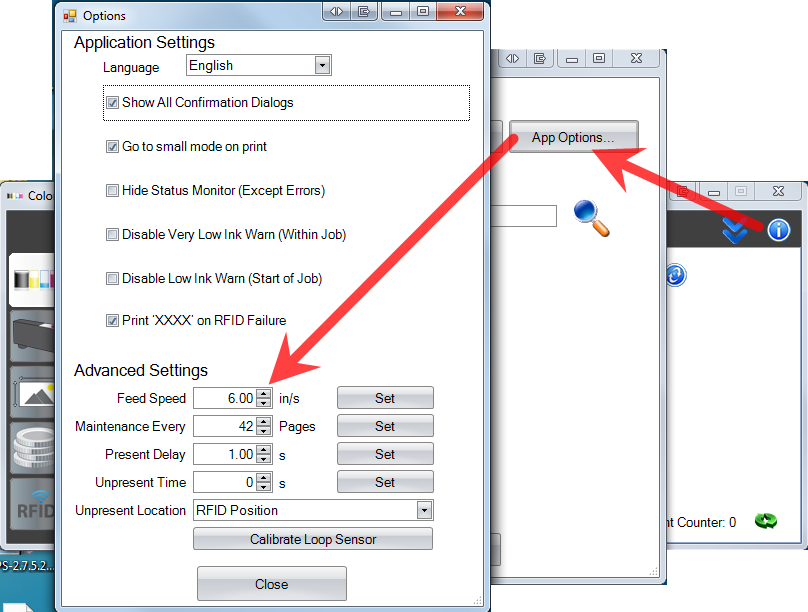
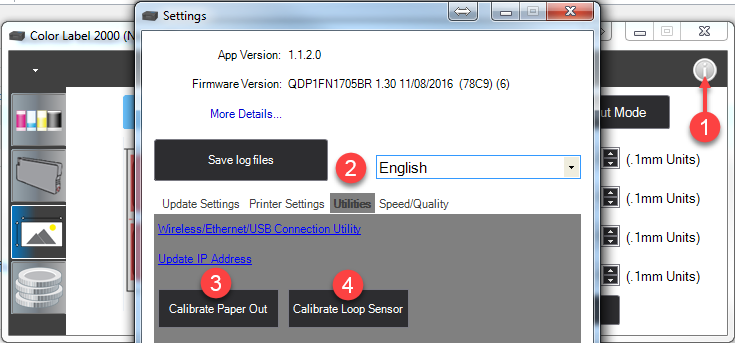
4. Clean and Calibrate the Loop Sensor. Over time dust from the label stock can build up and block the loop sensors under the label stock. There are three IR receiver sensors at the back and one IR emitter sensor at the front. Use canned air to blow out this area. Now do a loop sensor calibration to make sure there is a slack loop below the roll. This ensures easy feeding. The printer grit roller/pinch rollers to not have enough force to pull labels directly from the roll. This is why we have a system to create a slack loop below the roll. To calibrate the loop sensor follow the procedure below for your printer.
4b. LX900
a. Unload the label stock and remove it from the printer.
b. Turn off the printer.
c. While holding down the feed button, turn the printer power back on.
d. Reload the label stock.
4c. LX2000. If you are using an LX2000/1000 calibrate paper out and the loop sensor in the status monitor.

6. Label Stock Loading. The label stock may not be loaded properly. See this article for loading tips.
8. Preprinted Stock. Preprinted stock is not recommended for the LX series of label printers because the printed areas can be misread by the label gap sensor as a gap between labels. This can cause the printer to back up and find a preprinted area to start printing instead of the next label. Depending on the layout of the pre-printed area, you may be able to adjust the sensor position to avoid this dark pre-printed area. You could also add a black mark to the back of the label stock, corresponding to the gaps. This sensing method is not as susceptible to misreading preprinted areas as label gaps.
9. Slippery Backing/Liner Material. Test the unit with the label sample material that came with the unit or any other type of label stock. If it prints correctly, your label stock may not be compatible. The feed rollers need to grab the liner to feed it through the printer. If they slip as they are feeding you, you could see prints that are shorter than they should be, printing over the same place, skipped labels, or inconsistent start position.
12. Orientation. If the Portrait / Landscape setting does not correspond to the label stock installed, this will also cause the printer to print over the gap and onto the next label. Make sure this is set correctly. See this article.
13. Tear Bar (LX900, LX910, LX2000, LX3000 and LX4000 only). The labels could be getting caught on the tear bar as it back feeds. Put the tear guard back on to see if the skipping stops.
14. Tear Off Labels (LX900, LX910, LX2000, LX3000, and LX4000 only). If you are letting the labels fall on the floor after printing, the roller doesn't have enough grip to pull back on the labels when it needs to back feed to do maintenance. This would be more prone to happen with smaller labels because the grip roller has less surface area to hold on to. On larger labels, it has an increased surface area for the grip roller and has enough force to overcome the slight resistance that the tear bar would cause. To test, see if the skipping occurs once the labels hit the floor after printing.
17. LX500 Label Stock Roll Issue. If you are using an LX500, check for the following defects on the label stock roll.
18. LX600/LX610 Create Loop. If you are using an LX600/LX610 make sure to check the Create Loop Option - See this article.
Related Articles
My LX610 or LX600 is skipping, slipping, printing over on the same spot or printing out of alignment left to right. Feed Stall. (LX610-LX600)
There are several reasons for skipping labels or a feed stall error on the LX-Series printers. A full article explaining all of the possibilities can be found here. See below for the LX600/LX610 specific reasons. Create Loop. Check the create loop ...“TOF Error” is displayed in the status monitor. Label stock will not load automatically or printer does not detect the label stock. (LX2000).
The LX2000 is not properly sensing the gaps between the labels on your label roll. (TOF = Top of Form) Check the following settings: Try pressing the "Resume/Feed" button on the front of the printer. If the error continues, press the “Cancel” button ...LX Series Printer prints a partial label and restarts/resets in the middle of a job. (LX910, LX3000, LX4000)
Sometimes the printer will restart if it encounters an error or an interruption in the data flow from the computer over the USB cable. It can be hard to realize that the printer is restarting if you don't see it happen. Instead, at the end of the ...There is a label stuck or jammed in the feed area of my LX Series label printer. Unable to feed in Label Stock. How can I remove it and prevent it from happening again?
If you are unable to feed in new label stock, you may have dust or debris blocking the stock sensor or part of a label stuck inside. Unexplained missing labels on the roll could actually be stuck inside the machine. If you don't think there is a ...How to create a slack loop to prevent Repeating sections of blurry printing - Inconsistent TOF alignment - Printing over on the same label using pre-die-cut labels. (LX600/LX610)
Issue: Pre Die-cut labels printed on the LX600 or LX610 has inconsistent Top of Form (Vertical) alignment or print over and over on the same label or have repeating sections of blurry printing. The smaller the size down to the minimum of 2", the more ...