Drives are not detected after a new drive was installed or top/bottom drives are swapped. (PTBurn SDK)
If you change to a new computer or receive your Publisher/Robot back from repair with new drives, it may be necessary to reassign top and bottom drives. Follow the steps below to reassign the drives.
1. Stop the PTBurn Service. Search for "Services". Open it. You will see "PTBurn Service" in the list. Right click on it and choose "Stop".
2. Download the latest calibration utility - Download v 1.06 (Works with all robots including 4200 and SE-3)
---Note: The calibration utility can also be used to calibrate picking positions and center the print image.
---Version 1.06 requires .Net 4.5
3. Extract the Zip. (We recommend this is added to a software installation package of the client software)
4. Run the utility - Calibration Tool.exe
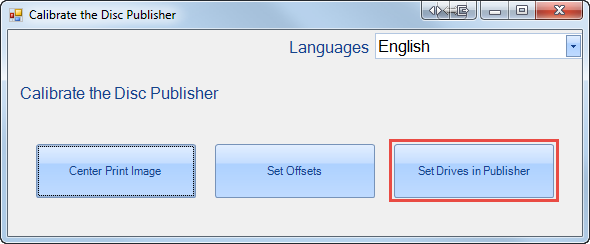
5. Click Set Drives in Publisher.

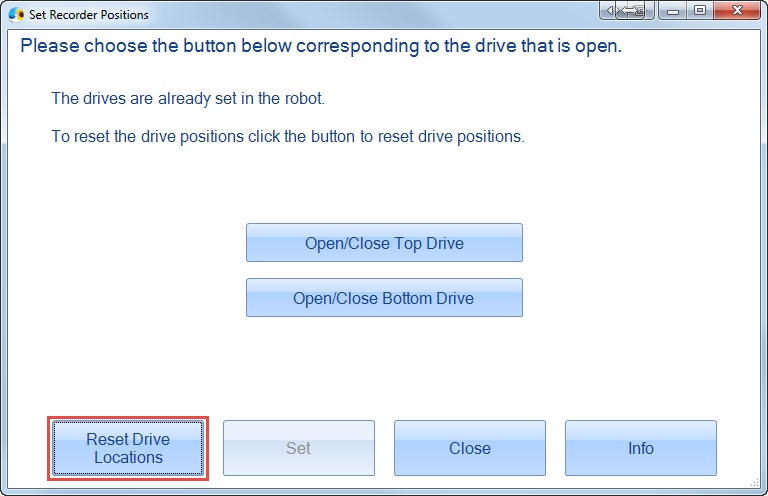
6. Click Reset Drive Locations.

7. The Publisher will reset. Close the utility.
8. Open the utility again. Click the Set Drives in Publisher button again.
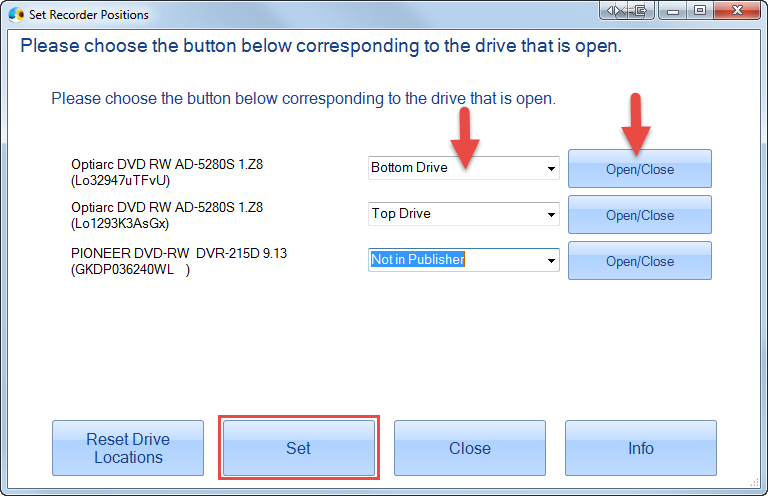
9. Now choose the top and bottom drives. Use the Open/Close buttons to determine which drive is the top and which drive is the bottom. Watch the drive tray in the Publisher while you do this.

10. Click the drop down to set the drive to either Bottom, Top or Not in Publisher. You should have one top and one bottom drive.
11. Click Set. The window will close. Now close the utility.
12. Start the PTBurn Service. Search for "Services". Open it. You will see "PTBurn Service" in the list. Right click on it and choose "Start".
Advanced Instructions:
Verify drives are set.
Make sure the PTBurn Service is running.
Open the C:\PTBurnJobs\Status\ System or Robot Status file. The status file is a text file that can be opened with notepad. It will show the drive and robot in this file.
[System]
SystemStatus=System OK or other errors such as: No cartridges are installed. Open the cover and press the left button. Install the cartridges and close the cover.
SysErrorString=No Errors
SysErrorNumber=0
RoboFWVer=1.22 01/18/2017
SerialNum=
DateManf=
SystemDesc=Disc Publisher 4200 Series
SystemDrives=2
GoodDiscsLaunch=0
BadDiscsLaunch=0
GoodDiscsLife=0
BadDiscsLife=0
DriveDesc0=HL-DT-ST BD-RE WH16NS58 TST4
DriveLetter0=D
DriveLocation0=Top Recorder
DriveDesc1=HL-DT-ST BD-RE WH16NS58 TST4
Tip: To make sure the file is being updated, you can delete the status files. If the service is running they will be recreated and be updated with the latest information.
Set the drives manually.
It is possible to set the drives manually if you know the Serial Number designation of the drive. The serial number designation can be found by running PTPublisher and then examining the "C:\ProgramData\PTI\PTPublisher\Log\PTP_JobProc.dbg" log.
02/16/2017 12:11:02:950, GetDrivesByType Found 2 Drives,3,,,0,JobProcessor.dll
02/16/2017 12:11:02:950,Drive Found: SIK9 G8J9183, SIK9 G8J9183,3,,,0,JobProcessor.dll
02/16/2017 12:11:02:950,Bottom Drive Found: SIK9 G8J9141, SIK9 G8J9141,3,,,0,JobProcessor.dll
Once the drive serial number is found you may enter it in the following location.
"C:\ProgramData\PTI\PTBurnService\Drives.ini"
This is an example of the text inside the ini file:
[Settings]
UseOnlyNewMethod=1
OnlyUseUSBDrives=1
[Disc Publisher SE-3]
DRIVE=Lq429SAvF6El
or
[Settings]
UseOnlyNewMethod=1
OnlyUseUSBDrives=1
[Disc Publisher 4200 Series]
TOP_DRIVE=SIK9 G8J9183
BOTTOM_DRIVE=SIK9 G8J9141
Put your SN after the Drive=
Set "UseOnlyNewMethod" to "1" to force the SDK to look at the ini for serial numbers.
Set "OnlyUseUSBDrives" to "1" to force the SDK to ignore non USB drives attached to the system. This should be set to "0" for Blu-ray eSATA units.
Article ID: 88537
Related Articles
Top and bottom drives are reversed/swapped. How do I reselect the drives in PTPublisher?
Top and bottom drives are reversed/swapped. How do I reselect the drives in PTPublisher? If you change to a new computer or receive your Publisher back from repair with new drives, it may be necessary to reassign top and bottom drives. Follow the ...Can I install CD / DVD / Blu-ray drive(s) in my Disc Publisher?
Primera will install drives for the flat rate repair fee associated with your product. If your unit was not originally a BLU unit Primera DOES NOT offer upgrades of any kind to Blu-ray drives. If you are out of warranty and decide to install drives ...Unable to initialize Job Manager (Invalid Drive) Application will close. (PTPublisher Error) - No duplicator drives appear in My Computer.
Unable to initialize Job Manager (Invalid Drive) Application will close. (PTPublisher Error) - No duplicator drives appear in My Computer. A CD/DVD/BDR drive was not detected inside the unit. There could be several reasons for this. 1. Update the ...Missing Cartridge, Invalid Cartridge, Incompatible Cartridge, Incorrect Cartridge, Cartridge not installed correctly, or Cartridge Data Error (LX600, LX610, LX910, Eddie, LX3000 or IP60)
If the cartridge is installed, but this error appears, it may be caused by insufficient contact between the cartridge and the carrier. Try the following: A. Verify the correct Part Number Cartridge for your printer is installed. 53491/53496 = ...Does Primera have an SDK for LX Series Label Printers? (IP60, LX910, LX500, RX500, LX610, LX600)
Print SDK Alpha version is available for IP60, LX910, LX500, RX500, LX610, LX600. Download it here. Start with the README.md A Help file is available in the Help folder. Sample C# application with source code in DemoProjects folder (the user needs ...