The AP360/AP362/AP380 stops during label application or you have to press the foot switch twice to complete the application.
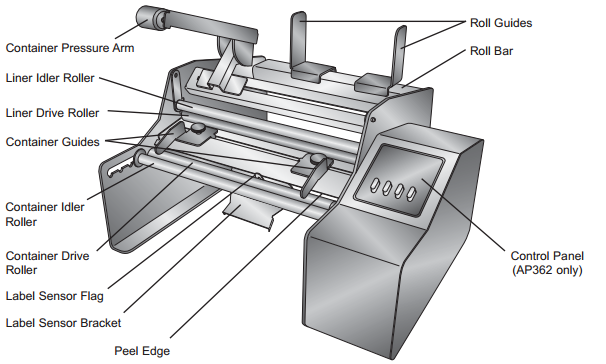
3. Any bubbles in the label stock caused by a slipping roller. For example, if the liner drive roller at the top is slipping as it is trying to pull the label stock through it will cause a bubble in the stock. This is because the roller turning the container and the roller pulling the liner are effectively moving at different speeds. This is caused by the label bouncing during the application process. If the label bounces up it causes the sensor to move back to its home position at the peel edge. If the sensor moves, the AP362 thinks the label has been applied and stops.
Try the following additional solutions:
5. Move the label sensor closer to either side edge of the label or toward the center if it is already at the edge.
6. Move the container idler roller closer to the container drive roller. It should be as close as possible while still providing enough support to hold the container.
7. Place the container on the applicator while the drive roller is moving. Watch the container for excessive up and down movement. If the container shape is not a perfect cylinder it will cause the label to bounce. Remove the container from the applicator. Press the footswitch. Be ready to catch the label as it comes off the peel edge. If it comes completely off, you know the container is causing the problem.
8. Very light plastic containers can also cause bouncing. Try filling the container before applying the label.
9. Wrap labels around the liner idler roller. If your model does not support clamp force adjustment, to increase pressure, You can also try wrapping a few labels around the liner idler roller (silver roller). Start with one or two layers of labels and add more if it doesn't work. I recommend using a synthetic label (Poly, BOPP, Vinyl) that will not break apart when/if you want to remove the label from the roller in the future.
10. Increase liner clamping force (newer model AP380 only). Use the adjustment screws on either side to increase clamping force. This is especially useful if you have a very thin liner. Typically, clear liners are thinner and are more difficult to feed through the machine with out slipping. See this article.
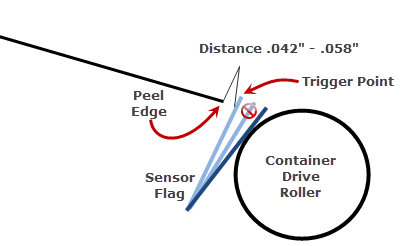
12. (Advanced Option!) You may also adjust the label sensor trigger point if it has come out of calibration. The sensor flag trigger point may be too close to the container drive roller. If that is the case, the slightest bump/bubble in the label will cause the liner drive roller to stop, therefore stopping the label from applying. It should be stopping the liner drive roller between .042 and .058 inches from the peel edge. You can gauge the trigger point by removing labels and containers from the applicator and then depressing the flag so that it is touching the container drive roller. Press the foot switch. Now slowly let the flag fall back toward the peel edge. It should stop the liner drive roller between .042 and .058 inches from the peel edge. You can make a gauge by measuring the thickness of several sheets of paper or Post-It notes. .058” is approximately 15 Post-It notes. (13 Post-It notes was .042”.) If it is out of position you can BEND the sensor flag into position. There is a pivot point on the sensor flag that can be bent by hand.


Related Articles
The AP-Code Date Coder is not printing. Status is Ready, the container moves, the label is applied but nothing is printed.
1. Ensure the Roller Track Wheel is installed properly so that it touches the liner drive roller. Watch the Printer Status screen. When you press the foot switch, the Printer State should change to "Printing". If the status remains on Ready, it means ...How to Create A Custom Label Order
1. Go to https://www.primera.com/customlabel/generate/label/ 2. Select your printer type. 3. Then click Select Materials. View the material guide for more information on each material type of look at the pictures below. Premium Gloss Matte BOPP High ...How do I correctly load the label stock to avoid feeding and printed image alignment offset problems? (LX Series)
Incorrect loading of the label stock is the number one reason for horizontally or vertically offset images and a variety of other feeding problems. Below is a top view of the printer with the cover open. There are several main areas to watch for when ...AP-Code Printed Text looks stretched, squished or garbled.
If the text looks garbled, make sure the DPI in the settings area is set to 600 DPI. Any recently purchased AP-Code requires the 600 DPI setting. Older AP-Codes may require 300 DPI. See the screen capture below for details. If you are not sure what ...Receive error - Failed to Communicate - Print stops in the middle of a disc. (Mac Only)
Receive error - Failed to Communicate - Print stops in the middle of a disc. (Mac Only) There may not be enough USB bandwidth available for the print to complete successfully. Remove all other USB connections especially USB drives from the ...