My Primera Printer is not printing - The printed file appears in the print queue and then disappears after a few moments. (PC Only)
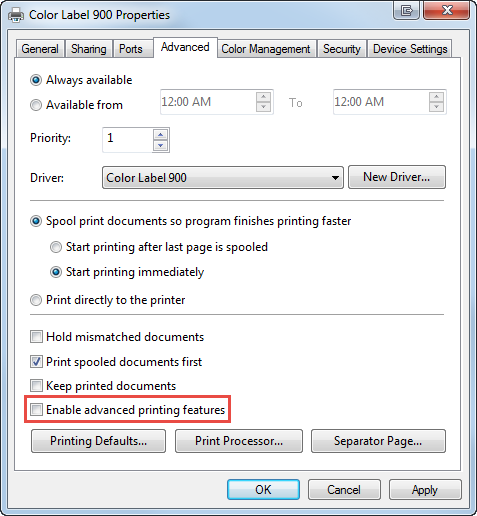
B. Advanced Printing Features.
2. Click on the printer name. Example: “Color Label 900”. Choose Manage.
3. Choose Printer Properties
4. Go to the Advanced Tab.
5. Uncheck “Enable advanced printing features”
D. Disable Print Manager. If you are printing from SureThing 5.x (Disc Publishers), try disabling the Print Manager. When you click print, you receive a print options screen. Click the Advanced Button. Uncheck "Use Printer Manager." Try again.
E. Turn off UAC. See this article. (Windows Vista, 7 or 8 only)
F. Disable Image Sharpening.
1. For Windows XP - Browse to C:\Documents and Settings\All Users\Application Data\PTI\Drivers\[Printer Name Folder]\PT_[PrinterInitials].ini (Application Data is a hidden folder)
-or-
For Windows Vista, 7,8,10 - Browse to C:\ProgramData\PTI\Drivers\[Printer Name Folder]\PT_[PrinterInitials].ini (ProgramData is a hidden folder) You will have to also disable UAC (User Account Control) using this procedure.
2. The folder name and ini file will vary depending on the printer. For example, a Bravo SE will be \Disc Publisher SE\PT_DPse.ini
3. Open the file in notepad or any text editor. Find the "SharpenLevel" key. Change the value after the = sign to "0". The default value is "11"
; Amount of image sharpening
; 0 = off
; 1-10 = increasing sharpening levels
; 11 = automatic
; 12 = off
SharpenLevel = 0
Note: In rare cases, disabling Image Sharpening may cause minor quality differences.
Article ID: 44864
Related Articles
Error: The printer couldn't print <Document Name>. Unable to connect to Printer. Printer in Error State. Generic Microsoft Windows Error Printing on Edible Ink Printer. (Eddie) (PC Only).
1. Connect the USB, connect power, and switch the printer on. 2. Print Hub. "The printer couldn't print <Document Name>" This generic Microsoft Windows error may occur after a Windows Update. A more specific error may be displayed in the Primera ...Print briefly appears in the printer queue and then disappears. Nothing is printed. (LX2000)
Print briefly appears in the printer queue and then disappears. Nothing is printed. (LX2000) On some systems (especially Windows Server OS versions) it may be necessary to give special permissions to the Spool\Printers folder depending on existing ...How do I uncheck "Enable Advanced Printing Features" in the Printer Driver to fix USB communication issues?
If you encounter the following errors this procedure may resolve it. Partial printed labels or cookies or the printer stops printing in the middle of your image. Does not print. The print job disappears from the print queue immediately after ...Eddie stops, pauses or resets in the middle of printing the cookie causing a partially printed cookie. (Eddie)
Sometimes Eddie will restart if it encounters an error. It often causes issues if this happens because you have a cookie on the tray. (or Cookie + Custom Tray) So when it starts up, it either displays an error OR it will smash the cookie into the top ...Print Queue- PT Status Monitor says Printing, but there's no activity on the printer. LX400, LX900, LX1000, LX2000 (Windows 10 1903 release)
Windows 10 release 1903 causes these issues. Try the following solutions: 1. Update to the latest version of Windows. Windows 10 release 2004 fixes this issue. Alternatively, you may upgrade your existing version of Windows 1903 or 1909 with a ...