Labels are printing with poor quality or missing colors. (LX900)
Try the following solutions:
1. Change the Cartridge. Check your cartridge levels. If the lowest percentage color corresponds to a missing color in your print, replace that cartridge. Even if the software reports that the cartridge has 30% ink remaining it may still be empty and need to be replaced.
The CMYK color wheel below will give you some idea of which color to replace. Here are a few examples:
- Green is printing Blue = Replace the Yellow Cartridge
- Blue is printing Pink = Replace the Cyan Cartridge
- Black is printing Red, Blue or Green = Replace the Cyan, Yellow or Magenta Cartridge.

2. Secure Cartridges. Make sure the corresponding cartridge is snapped into place. Remove and reseat the cartridge to make sure an air tight connection has been made. You should hear a "click" when the cartridge is installed properly.
3. Clean the Copper Contacts. Ink overspray can build up inside the printer over time causing interrupted electrical signals. Remove the printhead and clean the copper contacts on the printhead carrier and the printhead with the alcohol wipe included with the printhead or an isopropyl alcohol soaked paper towel.
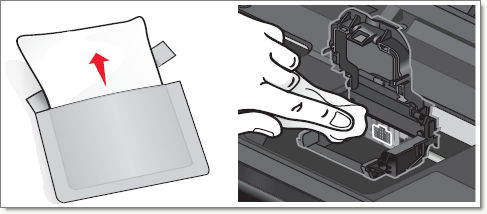
4. Clean the Printhead (Automatic Method).
1. Open the PTStatus monitor.
2. Click Clean Printhead on the Cartridge Utilities Tab (second tab). The printer will clean for 2-3 minutes. Do not unplug power during this process.
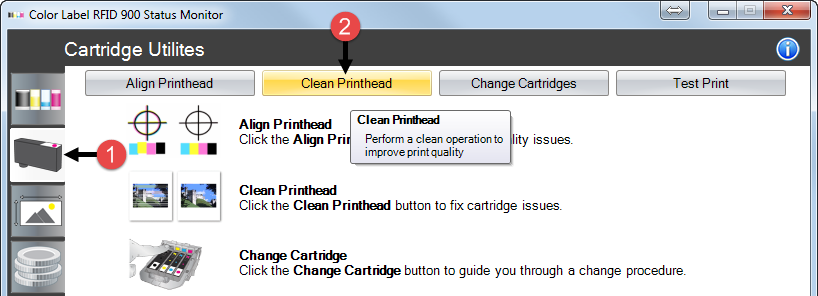
You can click Test Print after the clean process to see if all of the nozzles are clear. You will need a sheet of paper for this process. This will tell you specifically which color is clogged. You may need to repeat the clean and test print process up to 4 times depending on how clogged the printhead is. Only repeat the procedure if you start to see improvement after each clean print.
During the clean process the printer will make several loud whirring noises. This is normal! This is the sound of a pump forcing ink through the nozzles. If you do not hear this sound, the clean purge print did not complete successfully. Try again.
5. Missing or misaligned printhead gasket. The gasket creating a seal between the printhead and the individual cartridge can fall out or partially block the connection point. In either case, that particular color will not print correctly. There are four gaskets inside the printhead, one for each color. Replace the gasket if it is out of place or replace the printhead if it is missing. You can purchase replacement print head gaskets at our Primera Spare Parts Store or simply take them from old print heads if available.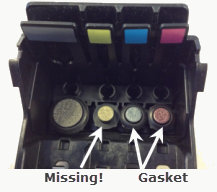
6. Manually Clean the Printhead. Please try steps 1-5 before attempting this procedure. Repeated manual cleanings can damage the nozzles.
a. Remove the printhead. This short instructional video explains how to remove the print head.
b. Moisten a lint-free cloth with rubbing alcohol or locate the alcohol wipe that came with the printer/printhead.
c. Hold the cloth/wipe against the nozzles for three seconds. This will “wick” some additional ink onto the cloth/wipe.
d. Now drag the printhead across the cloth/wipe in one direction only.
e. Repeat the process until all colors appear evenly on the cloth/wipe.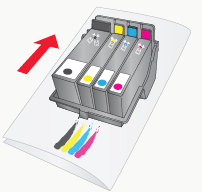
f. Also try cleaning using an Ultrasonic Jewelry Cleaner - Follow these instructions.
7. Preventing clogged nozzles
Clogged nozzles on the printhead can be caused by non use of the printer for extended periods of time. Follow these guidelines:
- Always keep the LX900 plugged in and turned on. The printer will do periodic maintenance to make sure the nozzles do not clog.
- Never store a used printhead outside of the printer. The nozzles will dry out with exposure to air. If you must store a printhead outside of the printer, place full or empty cartridges in the printhead and put the entire printhead and cartridges in a sealed plastic bag.
- Use the printer regularly!
8. Print Quality Setting. Set the Print Quality level to "Quality 4". The lower (and faster printing) quality may not be sufficient for many solid color areas. Increasing the quality increases print time because the printer makes more passes over the media. However, it also produces a more consistent print. Higher quality settings do not consume significantly more ink than lower quality settings.
9. Replace Printhead/Cartridge. The cartridge may be empty or defective. The printhead nozzle for one color could be clogged. The fastest way to diagnose a quality problem is to have backup printheads and cartridges available for comparison testing. If one color is missing, replace that color cartridge(s). Next try replacing the printhead.
10. Update Firmware. If you have recently changed your printhead and noticed offset, blurry or shadow text, you must update your firmware.
PRINTHEAD / CARTRIDGE REPLACEMENT PROCEDURE
If you think your cartridge/printhead is defective, please contact tech support to arrange for a replacement. Tech support may ask you to perform troubleshooting before sending a replacement cartridge or printhead.
Notes on Ink Replacement
- All replacements for defective cartridges or printheads must be processed through Tech Support.
- To receive replacement cartridges, you may be required to send in your defective cartridges/printhead.
- Tech Support will perform the cleaning procedures and tests mentioned above on all cartridges received.
- Tech Support will not replace cartridges with less than 50% ink remaining.
Notes on Printhead life
The estimated printhead life is approximately 26 black or 32 (of any) color cartridge changes whichever comes first. This is not a guarantee of printhead life. The printhead could last longer or shorter than this depending on many environmental and use factors.
To ensure uninterrupted printing capability, purchase a backup printhead now. You can purchase a printhead from our online store:
Replaceable Print Head - Part Number 53470
Please note:
- Printheads with over 26(32) cartridge changes will not be replaced for free under any circumstances.
- Printheads with under 26(32) cartridge changes may be replaced depending on the description and circumstances of the failure at the discretion of Primera Tech Support.
Article ID: 44703
Related Articles
Poor Quality Printing, Banding, Streaks, Missing Colors. My cartridge is defective. What can I do? (LX810, LX910, LX400, LX500, LX600, LX610, IP60, Bravo series, Eddie)
If the cartridge has not been used for some time, the inkjet nozzles may dry out. 1. Clean / Test Print Print the Clean/Test Print described in this article. Send us a picture of the clean/test print! 2. Clean the Cartridge Manually Remove the ...Label Graphic Design Tips for Beginners and Professionals. (LX600-LX610-LX900-LX910-LX2000)
Whether you contract your graphic design or do it yourself, these guidelines will help you get the best quality labels out of your LX series label printer. 1. Image Size/Shape. The image size should correspond to the size of the label you will be ...Discs are printing with poor quality or missing colors. (4100 Series)
Try the following solutions: 1. Change the Cartridge. Check your cartridge levels. If the lowest percentage color corresponds to a missing color in your print, replace that cartridge. Even if the software reports that the cartridge has 30% ink ...Labels are printing with poor quality, poor color matching or missing colors. (LX800-810 Only)
Labels are printing with poor quality, poor color matching or missing colors. (LX800-810 Only) This could be caused by a number of things, but usually is related to an ink nozzle not firing properly because it is clogged with dried ink. There are ...Colors are printing wrong. Colors are not accurate. Colors are not matching. (Eddie)
There are several possible reasons for colors to print incorrectly. The first step is to print a clean print on your cookie or a cardboard coaster. 1. Print a Clean Print. 2. Print your design or the Clean Print on a Cardboard Coaster or Piece of ...