Labels are applied to the container crooked. (AP360-AP362-AP380)
2. Check for Container Taper. Some containers, such as wine bottles, may have a slight taper that will cause the label to be applied crooked. See this article for a workaround to make tapered containers work better. https://customercare.primera.com/portal/en/kb/articles/can-i-apply-labels-to-a-tapered-container-ap360-ap362
3. Roll Guides should also be positioned very close to the roll, but not squeezing any part of the roll (so the roll has very little play side-to-side between the guides). The Roll Bar* also has some side-to-side movement, which is normal but can be eliminated by placing a shim made of folded paper between the side frame and the edge of the Roll Bar*.
4. "Settle-in". It may take several labels to allow the label stock to “straighten-out” or “settle-in” where it will run for the duration of the roll. It will “settle-in” quicker if you make sure to get the label stock loaded relatively square to the roll. Once the liner is locked into place you can make small adjustments by pulling on the left or right side of the liner. You can see that your labels are square by ensuring the edge of the next label off the roll is parallel to the Peel Edge*. Once this is square, adjust the roll and Roll Guides* to line up with that point on the roll. The distance from the Roll Edge to the side plate should equal the distance from the liner edge at the peel edge to the side plate. (see diagrams below). See #10 below for a guide to the settle-in process.
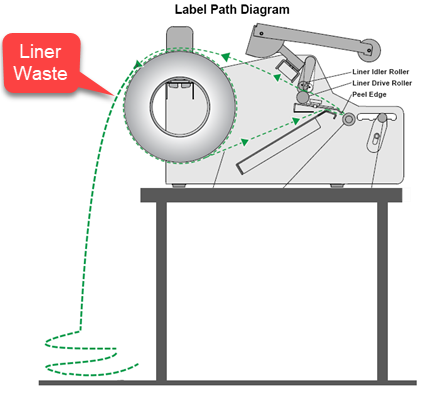
5. Label Liner waste should fall to the floor. Liner waste should not be allowed to accumulate behind the applicator. Instead, route it off the back of the table/bench so that it falls to the floor.
6. Label Guides. Make sure the label guides are in place at the back of the applicator before the peel edge. Tighten the Thumbscrews when the guides are in place.
7. Guide Position. For larger heavier rolls make sure that the roll is positioned on top of the Roll Guides with the magnetic portions facing in. This will minimize the chances that the heavy roll will push the guides out of place.
8. Roll Drag Arm. For lighter rolls make sure the Roll Drag Arm* is in place as described in the manual. If you do not have a Roll Drag Arm* please contact tech support.
9. Labels on a Core. The labels must be on a cardboard or plastic Core for application to work properly. If they are not on a core, attach them to another roll of the same size.
10. Add a guide at the peel edge (Advanced). If you are still having trouble with crooked labels, you can use 3M double-sided tape poster squares or something similar to guide the liner at the peel edge either permanently or just during the settle-in process, as described in #4. Apply the squares as shown in the picture below. You will need to cut them in half to make them fit. After applying them, press the foot switch to apply a few labels without a container in place. Watch the liner to see if it starts moving to one side or the other. If the liner does move, readjust the poster squares so there is a 1/2mm gap on either side. Repeat this procedure by applying more labels without a container until there is no movement after 3-5 labels.
*Refer to page three of the manual if you need help identifying any terms used in this article.
Article ID: 44950
Related Articles
My labels have bubbles or wrinkles. How can I resolve this? AP360/AP362/AP380
This issue can be caused by one of the following: 1. The container is not completely round, not smooth or has bumps or ridges. See this article on tapered containers. 2. The labels are applied crooked due to incorrect setup. See this article. 3. The ...Cuts do not line up with the prints or alignment is off. Cuts are crooked (LX610).
Cut alignment is calibrated at the factory. However, it is possible that you may need to adjust the cut line position for certain prints/cuts. 1. Alignment Test Print. You can adjust overall alignment if cuts are consistently misaligned where the cut ...The AP-Code Date Coder is not printing. Status is Ready, the container moves, the label is applied but nothing is printed.
1. Ensure the Roller Track Wheel is installed properly so that it touches the liner drive roller. Watch the Printer Status screen. When you press the foot switch, the Printer State should change to "Printing". If the status remains on Ready, it means ...Long labels are not feeding straight or printing crooked. Labels over 12 inches do not feed - display TOF Error. (LX910, LX3000, LX4000)
When labels are loaded for the first time, the printer attempts to find the gap between the first label and the second label. This is used to calibrate the length of the label and calibrate the gap sensor to look for similar gaps every x number of ...PL400 is not applying labels or labels are gradually shifting vertically on the pouch (PL400).
The front pouch sensor flag spring is out of place or detached. If it is detached the PL400 will not apply any labels. If out of place or has lost its spring tension, it may gradually shift the label placement on the pouch. 1. Disconnect power from ...