Manual Driver Installation Instructions: Errors: Installer stops on Verifying Driver stage - or - Device driver software was not successfully installed Error -or- Your printer failed to install. (Windows 7, 8, 10 - Any Printer)
Try the following solutions before manually installing.
- A. Run as Admin. Right-click on the driver installer file that you just downloaded. Choose "Run as Admin". Follow through the installation. If this procedure is successful the driver installer will display a successful message at the end.
- B. Give Rights. Follow this article to Give rights to the Printer and printer folders. Click on the driver installer file again. Follow through the installation. If unsuccessful, continue with the manual installation steps below.
- C. Manual Install. Use the instructions below to manually install the driver.
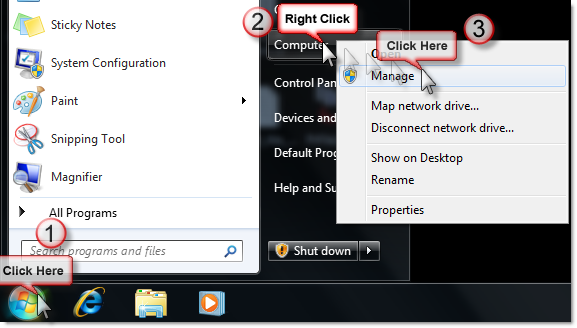
3. To install the driver Click the Windows button - Right Click on Computer - Click on Manage. In Windows 8, Windows 10 or 11, search "Device Manager".
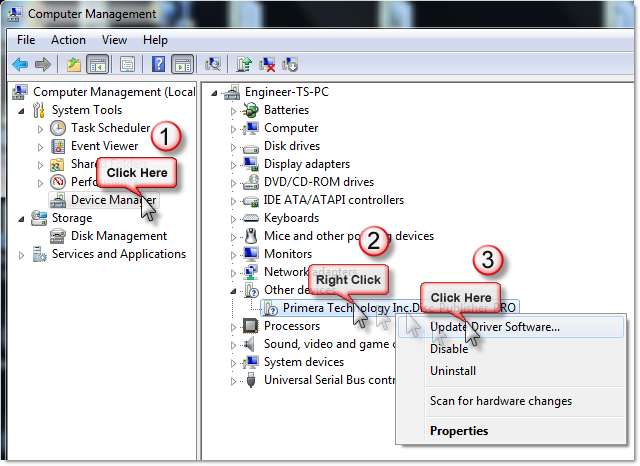
4. Click on Device Manager - Find the Primera product name under Other Devices - Right Click on it - Choose Update Driver. (The printer will not appear unless is is connected and communicating via USB).
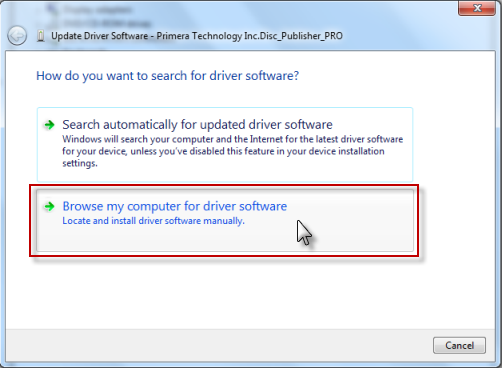
5. Click Browse my computer...
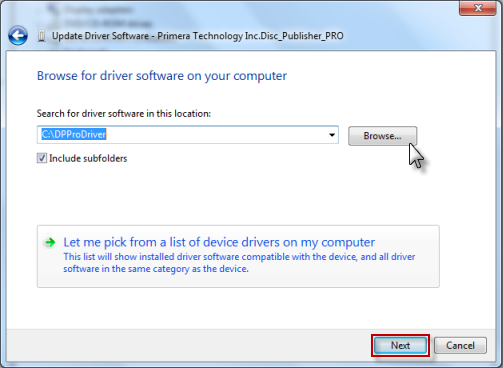
6. Browse to the location of the driver. If you download the driver from a link provided by support it will be in your download folder or where ever it was saved. Make sure you unzip it first before proceeding. If you tried the installer and it failed with one of the messages in the article title, it will be located here: C:\Users\<currentUser>\AppData\Local\Temp
- The driver will be in a folder named "Setup" or the product name such as "LX910 Disc" or "LX600 Disc"
- Under that folder will be another folder called "Post Setup" or "Printer Driver". Select it. Click Next.
- Note: AppData is a hidden folder. Un-hide the folder if necessary using these instructions.
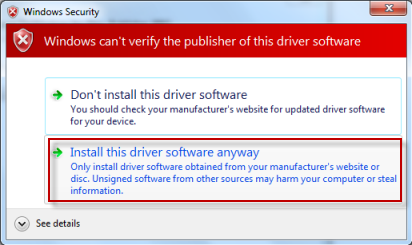
7. Click "Install this driver software anyway" or always trust this publisher.
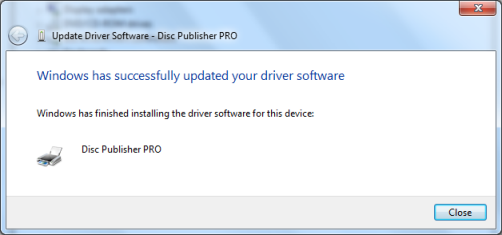
8. You will receive a "Windows has successfully updated..." message when complete.
Article ID: 44939
Related Articles
Error: Device driver software was not successfully installed -or- Your printer failed to install. (Windows XP - Any Printer)
Error: Device driver software was not successfully installed -or- Your printer failed to install. (Windows XP - Any Printer) 1. Power on the printer using the power button. This forces the PC to re-recognize the device. (If starting at this step, ...Installation Error - No internet Connection - Missing Internet Connection (Primera Printers - PC Only)
If you receive a "Missing Internet Connection" error during the installation of the software, the Internet connection may be blocked by security software or the installer is not compatible with your OS version. You may have to manually download the ...How do I completely remove a Primera Print Driver? (Windows 7/8/10/11)
New! Use the Primera Driver Removal Tool Download it here 1. Install the software. 2. Launch the software called "Driver Remover". You can search for it or find the icon on your desktop. You will be presented with a "Do you want to allow this app to ...Error received during printer driver installation - The software you are trying to install for this hardware: Printers has not passed Windows Logo testing to verify its compatibility with Windows XP.
Error received during printer driver installation - The software you are trying to install for this hardware: Printers has not passed Windows Logo testing to verify its compatibility with Windows XP. This is expected! You must click Continue Anyway ...How do I update my firmware, printer driver or software? (LX Series, Eddie and IP60)
For PC: 1. Open PrintHub 2. Click on Settings 3. Select the Update Tab 4. Click the "Check for Updates" button. Latest Version. If you click Check for Updates and receive the message "No updates Found," you are already on the latest version of the ...