Arm Picker Error / Carrier Stall received on unit start up (Bravo 4100 Series, 4200 Series, SE, and SE-3)
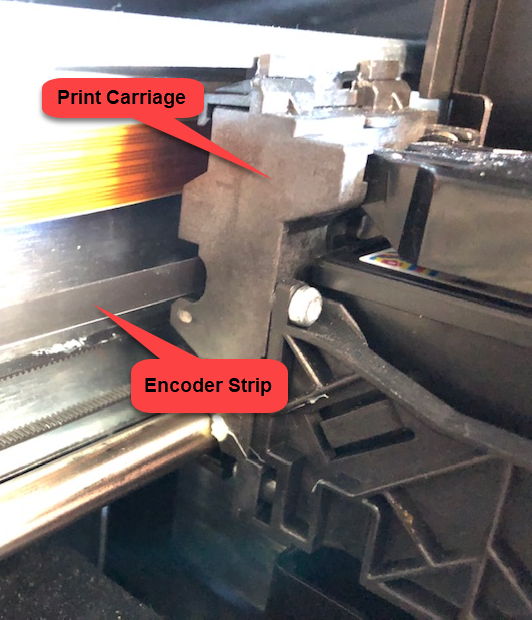
This error typically indicates that the encoder strip is not being detected by the sensor on the back of the printer carriage. The encoder strip is the clear strip that spans the left-to-right distance where the printer carriage (cartridge holder) and arm intersect. The strip has tiny black lines that are read by a sensor on the back of the carriage. This tells the unit where along the horizontal (left to right) path the arm/and or cartridges are located. If you receive this error when you start up the unit, it probably means that the sensor can not read the encoder strip. Check the following:
Missing Encoder
Make sure the strip is not missing. It may have broken, or the spring (far left side) that provides tension may have fallen off.
Out of Place Encoder
Ensure it is not twisted as it goes behind the carriage. It could be displaced from the notch behind the carriage. You may be able to put the encoder strip back in place. It slips in a hidden notch on the back of the carriage from the bottom. Unfortunately, you are not able to see the notch, so you need to put it back in place blindly. Here is a video on the repair process: https://customercare.primera.com/portal/en/kb/articles/how-to-fix-an-encoder-strip-that-is-out-of-place-on-your-primera-printer
Clean the Encoder
Inspect the encoder strip for ink, dirt, or grease that may be blocking the sensor from reading it. If necessary, lightly clean the strip with a mild cleaner. Do not scrub, since you may clean off the lines that are printed on the strip.
Arm off Frame
If you push too hard during cartridge installation, the arm may come off the frame if the cartridge carrier is in the middle. Instead, press the cartridge button on the top of the duplicator to move the cartridge carrier into the cartridge change position. To fix a carrier off the frame, follow the instructions below.
If you are unable to solve the issue, the unit may need repair. Please contact technical support.
Prevention for 4200 Series
If the carrier has come off the frame due to pressing too hard during a cartridge change, it may be because the cartridge change position is in the middle of the carrier frame width. There can be too much flex if the user presses hard.
Primera has a fix for this issue
in firmware version 1.40, where the cartridge change position can be set to be
on the left side (instead of the middle).
In order for this fix to be
enabled, the firmware version must be 1.40 (or higher) and a certain
system mode bit must be set.
To update:
1. Download and run the firmware update attached below by manually updating the firmware. Use the instructions in the article linked below to manually install the firmware.
- Manual Update Instructions for installing firmware
- 1.40 Firmware Update file attached below: fupdate.fzp
2. Once the firmware is at 1.40 (or higher) then you can set the bit with either of the commands below
- Manual Update Instructions for setting the System Mode
- SetSysMode_02.prn a Cartridge change on the left side (requires FW 1.40
or higher). THIS IS THE IMPROVEMENT USERS CAN BENEFIT FROM
- SetSysMode_00.prn a Cartridge change in the middle (what it has always been). Attached here in case you want to roll back for some reason.
Note: this Prevention/Fix is only available for 4200 series duplicators.
Article ID: 98970
Related Articles
Carrier Stall Error (IP60, LX600, LX610, LX910 or LX3000)
This error indicates that the printer is having trouble moving the cartridge carrier from side to side. Check the following: 1. Check for obstructions in the path of the cartridge carrier. Look for paper/media that has jammed or bubbled up and is ...How to fix an encoder strip that is out of place on your Primera Printer.
The encoder strip is a clear plastic strip with small timing marks printed on it, which tell the printer where the print head is located along the horizontal print head path. If it is knocked out of place due to cleaning, transport, or use, the ...My Bravo (SE, SE-3, II, XR, XRP, Pro, Xi-Series, 4100, 4200 Series) is not picking discs or is dropping discs?
Where and How is it failing? First, determine exactly where and how the robot is failing to pick. To do this, operate the unit with the cover open. You will need to trick the lid sensor into believing the unit's cover is still closed. Follow this ...My LX610 or LX600 is skipping, slipping, printing over on the same spot or printing out of alignment left to right. Feed Stall. (LX610-LX600)
There are several reasons for skipping labels or a feed stall error on the LX-Series printers. A full article explaining all of the possibilities can be found here. See below for the LX600/LX610 specific reasons. Create Loop. Check the create loop ...Carrier Stall Error (Eddie)
This error indicates the printer has trouble moving the cartridge carrier from side to side. Check the following: 1. Tighten the carrier belt tension. This article has a video of the process. 2. Check for obstructions in the path of the cartridge ...