Discs are printing with poor quality or poor color matching, streaks, banding, or missing colors. (BravoPro or XRP Only)
Discs are printing with poor quality or poor color matching, streaks, banding, or missing colors. (BravoPro or XRP Only)
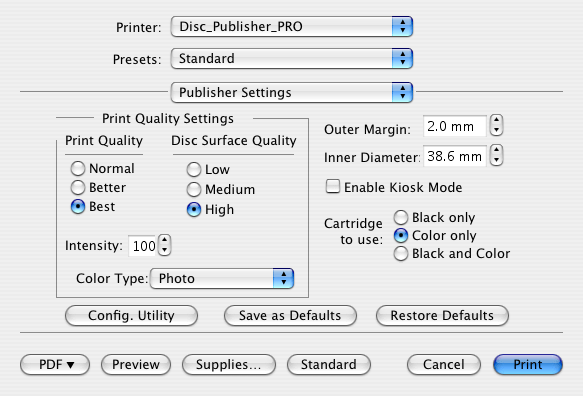
Four print settings affect print quality and color matching on a Bravo Pro or XRP:
Print Quality, Disc Surface Quality, Ink Cartridge, and Color Matching.
Using various combinations of these settings there are 36 different quality/color matching possibilities. Even though there are this many possibilities only two settings (Ink Cartridge and Color Matching) affect which color matching table will be used. There are a total of four combinations of these settings.
| Ink Cartridge | Color matching | Typical Use |
| Color | Photo | Photographic only image with non-black text |
| Color + Black | Photo | Photographic Images with black text or large black areas |
| Color | Graphic | Graphical Image with non-black text |
| Color + Black | Graphic | Graphical Image with black text or large black areas |
There are 9 quality settings within each of the major four color tables.
Below is the quality progression for any Cartridge or Color Matching settings from worst to best.
| Print Quality | Disc Surface Quality | Progression | Resolution (DPI) |
| Normal | Low | 1 (Least Quality - Fastest Print) | 1200 |
| Better | Low | 2 | 1200 |
| Best | Low | 3 | 1200 |
| Normal | Medium | 4 | 2400 |
| Better | Medium | 5 | 2400 |
| Best | Medium | 6 | 2400 |
| Normal | High | 7 | 4800 |
| Better | High | 8 | 4800 |
| Best | High | 9 (Best Quality - Slowest Print)* | 4800 |
*Default
The difference between each of these is the number of passes the cartridge makes to lay down ink to create the image. This affects the dpi of the image.
Below is an explanation of each of these individual settings.
Print Quality. Print Quality and Disc Surface Quality work together according to the table above. The number of passes the ink carriage makes decreases as you decrease Print Quality. As you can see from the table, decreasing Print Quality will have less of an effect on print output quality than decreasing Disc Surface Quality.
Disc Surface Quality. Disc Surface Quality and Print Quality work together according to the table above. The number of passes decreases as you decrease Disc Surface Quality. As you can see from the table, decreasing Disc Surface Quality will have more of an effect on actual print output quality than decreasing Print Quality.
Ink Cartridge.
Color + Black is best for images that have large areas of black graphics or text. Although you can print these same images with just the color cartridge, often the blacks will look darker.
Color Only is the default setting and is best for most images. With this setting the printer only uses the color cartridge to produce all colors including gray scale black and white images.
Monochrome Black is for images that have large black areas or black text. This will ensure that no color ink is being used. In some cases printing JPG files using Color + Black for an image that is all black will still cause some color ink to be used. Monochrome Black is not recommended for gray scale images such as a black and white picture. The ink spits of a black cartridge are not as small as those of the color cartridge. This allows for faster black printing but at a lower dpi. Using just the black cartridges for such images may result in a grainy image.
Color Matching.
Graphic mode is best used for graphical images where accurate color reproduction is not as essential. Images printed in this mode will look more vibrant because more ink is being used to produce them. However, printing images of people may produce skin tones that have a reddish tint.
Photo mode is best used for photographic images where accurate color reproduction is very essential. Images printed in this mode will look lighter than those printed in Graphic mode. Skin tones especially will look more natural in this mode.
NOTE: Exact color matching of the printed discs to the screen may never be possible since there are factors that affect this out of the driver's control. The surface of the disc reacts with the ink in the cartridge to produce the color. For this reason, when printing the same image to different brands of discs with different printable surfaces the printed output can look entirely different.
Other factors --
Ink Saturation. In any mode or quality setting you can cause the image to look lighter by decreasing the saturation.
Bidirectional/Cartridge Alignment. Bidirectional printing is enabled by default. You should not need to disable it since the driver forces bidirectional cartridge alignment for all new cartridges. However, in certain rare cases disabling bidirectional printing can improve the quality and sharpness of a print, text especially.
Source Image Format. If you are importing an image or a background into SureThing, certain image formats work better than others. Try JPG, TIF, BMP or any other SureThing supported image format. Make sure the DPI of the source image is at least 300 DPI. Try changing the image mode of the source file (CMYK or RGB). See this article on resolution for more information.
Media type/Disc Surface. Try new discs. There is a wide variety of printable-surface discs on the market. Some print great, some do not. The Tuff-Coat brand discs that we sell at www.primerastore.com are very good discs for printing and burning.
Cartridge. Try a new cartridge. Make sure that the ink cartridge has ink remaining. We often get cartridges returned as "bad" when in reality they've just run out of ink.
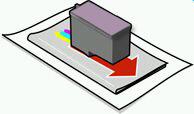
Manually Clean Cartridge. If you still see banding after all of the above, then you may need to manually clean the cartridge. Follow this procedure:
1. Remove the print cartridges.
2. Moisten a lint-free cloth with water.
3. Hold the cloth against the nozzles for three seconds. This will "wick" some additional ink onto the damp cloth.
4. Wipe in the direction shown.
5. Repeat the process.
NOTE: Even brand new cartridges may need cleaning. Depending on where the cartridge was purchased from, it may have been sitting in the reseller's warehouse for several months before you received it. If you keep a lot of cartridges on hand, it may have been on your shelf for several months. If the cartridge is older than 90 days, even if it is sealed in its packaging, the nozzles can begin to dry out.
Clean the Maintenance Station. This article explains how to clean the maintenance station to prevent quality problems.
How do I find printer settings?
PC: Go to Start - Control Panel - Printers and Faxes - Right click on the specific printer - Choose Preferences.
MAC: Go to Publisher Settings in the Copies and Pages drop down on the screen before you print -or- click Print Settings in Discribe. 
This article refers to the latest driver version for Mac and PC
PC Version 1.10
Mac Version 1.05
Related articles: Click here if you are having quality problems printing from a Bravo, Bravo II or Signature.
Article ID: 44830Related Articles
Poor Quality Printing, Banding, Streaks, Missing Colors. My cartridge is defective. What can I do? (LX810, LX910, LX400, LX500, LX600, LX610, IP60, Bravo series, Eddie)
If the cartridge has not been used for some time, the inkjet nozzles may dry out. 1. Clean / Test Print Print the Clean/Test Print described in this article. Send us a picture of the clean/test print! 2. Clean the Cartridge Manually Remove the ...Discs are printing with poor quality, poor color matching, streaks, banding, or missing colors. (Bravo, Bravo II, Signature Only)
Bravo or Signature Print Quality Problems This could be caused by a number of things, but usually is related to an ink nozzle not firing properly because it is clogged with dried ink. There are several things to try, one of which almost always ...Discs are printing with poor quality or poor color matching, streaks, banding, or missing colors. (Bravo SE)
Cartridge A defective, empty or clogged cartridge will cause all of the problems listed above. 1. Try a new cartridge. Make sure that the ink cartridge has ink remaining. We often get cartridges returned as "bad" when in reality they've just run ...Discs are printing with poor quality or missing colors. (4100 Series)
Try the following solutions: 1. Change the Cartridge. Check your cartridge levels. If the lowest percentage color corresponds to a missing color in your print, replace that cartridge. Even if the software reports that the cartridge has 30% ink ...Labels are printing with poor quality or poor color matching, streaks, banding, or missing colors. (LX400)
Cartridge A defective, empty or clogged cartridge will cause all of the problems listed above. 1. Try a new cartridge. Make sure that the ink cartridge has ink remaining. We often get cartridges returned as "bad" when in reality they've just run ...